
Tiling projects can feel big. Without the right gear, things get messy fast. Let’s get you ready with the essentials for a smooth job.
For a successful tile installation, you’ll need tiles, the correct adhesive, and grout. Essential tools include a notched trowel, a tile cutter or wet saw, tile spacers, tile leveling system, a level, a rubber mallet, and a good measuring tape. Don’t forget safety gear!
Getting all your tools and materials together is that crucial first step. But to really get great results, there’s a bit more to understand. I’ve been in the tiling accessory business for over 10 years, and I know what makes a difference. Let’s look at some common questions. This will help you, whether you’re a seasoned pro like many of my clients, or just getting started.
What tools are needed for tile installation?
Are you worried about picking the right tools? Using the wrong ones means wasted time and a job you’re not happy with. Here’s a simple list of what you absolutely need.
Key tools for any tile installation include a notched trowel to spread adhesive, a tile cutter or wet saw for shaping tiles, and tile spacers for even grout lines. You’ll also need a level, a rubber mallet, and a grout float.
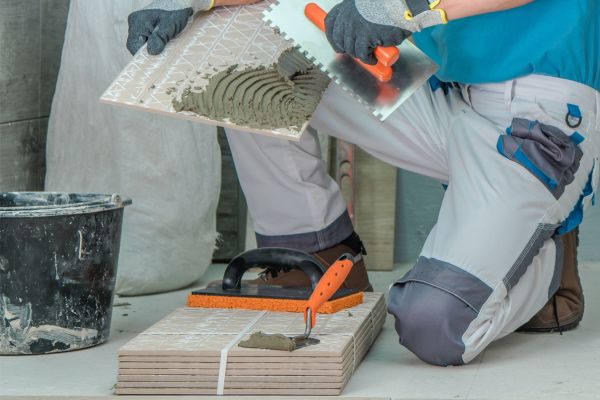
Let’s dive a bit deeper into these tools. As a manufacturer, I, Robert Lee from NIUYUAN, have seen how the right tools impact the final finish. For my B2B clients like Michael in Germany, who distribute large volumes of tiling accessories, consistent quality in even the smallest tool, like a tile spacer, is paramount.
Key Tiling Tool Categories:
- Measuring and Marking:
- Tape Measure: For all your measurements.
- Pencil or Marker: To mark tiles for cutting.
- Level: Crucial for ensuring tiles are straight and even. A 2-foot level is good for most jobs, but longer ones are better for large floors.
- Chalk Line: For snapping long, straight layout lines.
- Cutting Tools:
- Manual Tile Cutter (Snap Cutter): Good for straight cuts on ceramic and porcelain tiles. You score the tile and then snap it.
- Wet Saw: Essential for cutting harder materials like porcelain, natural stone, or for L-shaped cuts and curves. The water cools the blade and reduces dust.
- Tile Nippers: Used for making curved cuts or shaping tiles around obstacles.
- Rubbing Stone/Brick: To smooth any sharp, cut edges.
- Adhesive Application Tools:
- Buckets: You’ll need at least two – one for mixing adhesive and one for water.
- Notched Trowel: This is key for applying the adhesive. The notch size and shape (square, U-notch, V-notch) depend on the tile size. Larger tiles need larger notches for more adhesive coverage.
- Margin Trowel: Useful for scooping adhesive out of the bucket and applying it in tight spots.
- Drill with Mixing Paddle: For mixing thinset mortar or grout to the right consistency.
- Tile Setting Tools:
- Rubber Mallet: To gently tap tiles into the adhesive and ensure they are level.
- Beat Block (Beating Block): A flat block of wood or rubber used with the mallet to evenly set larger tiles or sheets of mosaic.
- Tile Spacers: These are critical for uniform grout lines. At NIUYUAN, we manufacture a wide range of high-quality tile spacers (from 1mm up to 10mm and more). For distributors like Michael, providing reliable spacers in various sizes like 2mm or 3mm is a core part of their business.
- Tile Leveling System: This includes clips, wedges, and pliers. These systems are fantastic for preventing lippage (uneven tile height), especially with large format tiles. Our NIUYUAN tile leveling systems are designed for precision and ease of use, something our OEM clients appreciate.
- Grouting Tools:
- Grout Float: Used to press grout into the tile joints. Rubber floats are common; epoxy floats are needed for epoxy grout.
- Sponges: Large tiling sponges are needed for wiping excess grout off the tile surface.
- Buckets: Again, for clean water during the grouting process.
- Safety Gear:
- Safety Glasses: Protect your eyes from flying debris and dust.
- Gloves: Protect your hands from sharp tile edges and chemicals in adhesives and grout.
- Knee Pads: Essential for comfort when working on floors for extended periods.
- Dust Mask: Important when cutting tiles (especially with a dry saw) or mixing powdered products.
Having these tools on hand will make your tiling project go much smoother. I always tell my customers, investing in good tools pays off in the quality of your work and the time you save.
What is the 3 4 5 rule for tiling?
Do you need perfectly square tile layouts? Crooked tiles can ruin the entire look of a project, which is a big concern. The 3-4-5 rule is your simple secret to getting those crucial straight lines.
The 3-4-5 rule is a simple way to create a perfect 90-degree angle, essential for square tile layouts. Measure 3 units along one line, 4 units along an intended perpendicular line; if the diagonal distance between these two points is exactly 5 units, your corner is square.

This rule is a practical application of the Pythagorean theorem, which you might remember from school: a² + b² = c². In our case, 3² + 4² = 5² (which is 9 + 16 = 25). This mathematical principle is a tiler’s best friend for ensuring accuracy from the very start of a project. I’ve seen many projects, big and small, and starting with a square layout is fundamental.
How to Apply the 3-4-5 Rule in Tiling:
- Establish a Baseline: Decide on your primary starting wall or line. This is often the longest, most visible wall in the room.
- Mark Your First Measurement (3 Units): From your chosen starting corner, measure 3 units along this baseline. A “unit” can be anything – feet, inches, meters, centimeters – as long as you use the same unit for all three measurements. For example, measure 3 feet along the wall and make a mark.
- Mark Your Second Measurement (4 Units): From the same starting corner, measure 4 units out into the room, aiming to create a line that is roughly perpendicular (at a 90-degree angle) to your baseline. Make a temporary mark.
- Measure the Diagonal (5 Units): Now, measure the distance between the 3-unit mark on your baseline and the 4-unit mark you just made.
- Adjust for Square:
- If the diagonal measurement is less than 5 units, your 4-unit mark is too close to the baseline. Move it slightly further away.
- If the diagonal measurement is more than 5 units, your 4-unit mark is too far from the baseline. Move it slightly closer.
- Keep adjusting the position of the 4-unit mark and remeasuring the diagonal until it is exactly 5 units.
- Snap Your Perpendicular Line: Once the diagonal is precisely 5 units, the point where your 4-unit measurement ends is perfectly square to your baseline from the starting corner. You can now snap a chalk line from the corner through this adjusted 4-unit point. This new line is your perfectly perpendicular reference.
For larger areas, you can use multiples of 3-4-5, such as 6-8-10 or 9-12-15, for even greater accuracy over longer distances. Using this rule ensures that your tile courses will run straight and true, preventing unsightly converging or diverging grout lines as you cover the area. This is a detail that professionals, like the contractors Michael supplies, always get right.
What equipment is used for tiling?
Are you feeling a bit lost with all the equipment talk? Missing even one small item can stop your tiling project in its tracks. Let’s make sure you have a complete picture of the equipment.
Tiling equipment covers everything from surface preparation (like scrapers and maybe sanders) to tile setting tools (trowels, cutters, our NIUYUAN spacers, and levels), grouting tools (floats, sponges), and various cleanup supplies. Safety gear is also vital.

When I talk with B2B buyers like Michael, who manage inventory for building material distribution, they need to anticipate the full spectrum of their customers’ needs. It’s not just about the tiles themselves, but all the supporting equipment that ensures a professional job. Let’s break down the equipment by the phase of work.
Phase 1: Surface Preparation Equipment
Before a single tile is laid, the surface must be perfectly prepared.
- Cleaning Tools: Broom, dustpan, shop vacuum for removing all dust and debris.
- Scrapers/Chisels: For removing old flooring, adhesive residue, or loose paint. A long-handled floor scraper is great for large areas.
- Leveling Tools: Depending on the subfloor, you might need a grinder with a masonry disc to smooth out high spots in concrete, or leveling compound and a smoothing trowel for low spots.
- Measuring & Marking Tools: Tape measure, chalk line, level – these are used again here to assess the subfloor and plan layouts.
- Waterproofing (If needed): For wet areas like showers, equipment for applying liquid membranes (rollers, brushes) or sheet membranes (utility knife, roller) will be necessary.
Phase 2: Tile Setting Equipment
This is where the actual tiling happens.
- Mixing: Heavy-duty drill with a mixing paddle attachment, and sturdy buckets for mixing adhesive.
- Adhesive Application: Notched trowels (various sizes as discussed), margin trowel.
- Tile Cutting: Manual tile cutter, wet saw, tile nippers, hole saws (for pipes).
- Tile Placing & Leveling: Rubber mallet, beat block, a good quality level (2ft and 4ft are useful), Tile Spacers, and Tile Leveling Systems. As a manufacturer, NIUYUAN offers a wide array of spacers and complete leveling systems (clips, wedges, pliers). These are indispensable for achieving flat surfaces and consistent grout lines, especially with today’s popular large-format tiles. For Michael’s customers, having access to reliable systems like ours is a huge plus.
Phase 3: Grouting & Cleanup Equipment
The finishing touches.
- Grout Application: Grout float (rubber for cementitious grout, epoxy float for epoxy grout).
- Grout Removal & Cleaning: Grout sponges (hydrophilic are best), at least two buckets (one for initial rinse, one for cleaner water).
- Haze Removal: Microfiber cloths or a terry cloth towel for buffing off grout haze once it dries. Sometimes a specific grout haze remover solution is needed.
- Grout Saw (for repairs): If you need to remove old or mistakes in grout.
Here’s a quick table summarizing the equipment:
| Phase | Essential Equipment | Optional/Specialized Equipment |
|---|---|---|
| Preparation | Shop Vacuum, Scrapers, Tape Measure, Level, Chalk Line | Floor Grinder, Leveling Compound Tools, Waterproofing Gear |
| Tile Setting | Notched Trowel, Buckets, Drill & Mixer, Manual Cutter/Wet Saw, Mallet, Level, Spacers | Tile Leveling System, Nippers, Hole Saw, Suction Cups |
| Grouting | Grout Float, Sponges, Buckets | Grout Saw, Haze Remover Solution, Microfiber Cloths |
| Safety | Safety Glasses, Gloves, Knee Pads | Dust Mask (especially for cutting/mixing), Ear Protection |
Understanding the full range of equipment helps everyone, from the DIYer to the large contractor Michael might supply, plan their projects effectively.
Which material is used for tile fitting?
Are you wondering about the right materials for fitting tiles? Using the wrong ones can lead to a failed installation down the line. Let’s cover the key materials needed for a strong, lasting tile job.
The main materials for tile fitting are the tiles themselves, a suitable adhesive (like thinset mortar or mastic), grout, and often tile spacers for even joints. Depending on the area, a backer board or underlayment might also be essential.

As someone who has been in the tile accessory manufacturing business at NIUYUAN for over two decades, I know that the quality of these fitting materials is just as important as the tiles themselves. For my clients like Michael in Germany, who are sourcing in bulk, ensuring that even the smallest component, like a tile spacer, is made from high-quality raw materials is crucial for their reputation.
Core Materials for Tile Installation:
- Tiles:
- Types: Ceramic, porcelain, natural stone (marble, granite, slate, travertine), glass, mosaic sheets.
- Considerations: Choose based on the application (floor, wall, countertop, wet/dry area), expected traffic, and desired aesthetic. Porcelain is very durable and water-resistant, great for floors and wet areas. Ceramic is generally more affordable and easier to cut. Natural stone requires sealing and specific care.
- Adhesives (Bonding Agents):
- Thinset Mortar: This is a cement-based product and the most common adhesive for setting tiles. It provides a strong, rigid bond.
- Unmodified Thinset: Just cement, sand, and lime. Needs a latex additive if used with less porous tiles or over certain substrates.
- Modified Thinset: Pre-mixed with latex/polymer additives for improved bond strength, flexibility, and water resistance. Generally recommended for porcelain tiles and most floor installations.
- Mastic: An organic, pre-mixed adhesive. It’s convenient but not suitable for wet areas (showers, bathroom floors) or high-traffic floors as it can re-emulsify when wet and isn’t as strong as thinset. Best for dry wall applications like kitchen backsplashes.
- Epoxy Mortar: A two-part system (resin and hardener) that offers excellent bond strength, chemical resistance, and is waterproof. It’s more expensive and has a shorter working time, typically used in industrial or commercial settings, or for specific tile types like glass that might be sensitive to moisture in other mortars.
- Thinset Mortar: This is a cement-based product and the most common adhesive for setting tiles. It provides a strong, rigid bond.
- Grout:
- Function: Fills the joints between tiles, locking them together and preventing dirt and water from getting underneath.
- Cement-Based Grout:
- Sanded: Contains sand for strength. Used for grout joints 1/8 inch (3mm) wide or larger.
- Unsanded: No sand, smoother texture. Used for joints smaller than 1/8 inch, and with delicate tiles like polished stone or glass that could be scratched by sand.
- Epoxy Grout: Extremely durable, stain-proof, chemical-resistant, and doesn’t need sealing. Ideal for countertops, high-traffic areas, and wet environments. It’s more expensive and can be harder to work with than cement grout.
- Pre-Mixed Grout: Offers convenience and consistency but can be pricier. Ensure it’s suitable for your application.
- Backer Board / Underlayment (Substrate Preparation):
- Cement Board (e.g., Durock, HardieBacker): A stable, water-resistant substrate for tiling in wet areas like shower walls and floors. It won’t rot, swell, or degrade with moisture.
- Uncoupling Membranes (e.g., Schluter-DITRA): Used on floors, especially over wood subfloors or concrete slabs prone to cracking. They absorb stress and prevent cracks from telegraphing through to the tile.
- Waterproofing Membranes: Liquid-applied or sheet membranes create a waterproof barrier in showers and other wet zones.
- Tile Spacers and Leveling Systems:
- Tile Spacers: Small plastic pieces (X-shape, T-shape, or leave-in style) used to create uniform grout lines. At NIUYUAN, we manufacture a wide variety of these, from 1mm to 10mm, using precision injection molding for consistency. This is vital for our B2B customers who need reliable products.
- Tile Leveling Systems: These systems (clips and wedges or screw-type) are crucial for preventing lippage, especially with large format tiles or when tiling uneven surfaces. Our NIUYUAN leveling systems are a key product line, and we offer OEM/ODM services for branding and packaging, which is often important for distributors.
- Sealers (Optional but often Recommended):
- Grout Sealer: Applied after the grout has cured, it protects cement-based grout from stains, dirt, and moisture.
- Tile Sealer: Necessary for porous tiles like natural stone to protect them from staining and water absorption.
Choosing the right combination of these materials is key to a durable and professional-looking tile installation. I always advise checking tile manufacturer recommendations for compatible adhesives and grouts.
Conclusion
Successful tiling really comes down to having the right materials, the correct tools, and using good techniques. Plan your project well, and you’ll achieve great, lasting results every time.