
To use a tile leveling system, spread thinset evenly, slide the leveling clips under the tile edges, and lay the adjacent tile. Insert the reusable wedges into the clips and tighten them with a leveling plier until the surface is perfectly flush. Allow the mortar to cure for 24 hours, then kick the clips off parallel to the grout lines for a flawless, lippage-free finish.
Drawing on our years of manufacturing experience, this ultimate guide will walk you through the exact, step-by-step process of how to use a tile leveling system properly. We will share insider tips on avoiding common installation failures and explain what makes a professional-grade leveling system stand out. Let’s get started.
What a Tile Leveling System Can (and Cannot) Fix
Before you grab your trowel, we need to set the right expectations. As a manufacturer, we often see buyers misunderstand the true purpose of these tools. A tile leveling system is a precision finishing tool, not a miracle worker for a bad floor.

Here is exactly what the system is designed to do, and the strict limits you need to know.
What It Fixes (The Benefits)
-
Tile Lippage: It mechanically forces the edges of two adjacent tiles to stay at the exact same height. This eliminates the minor height differences (lippage) that cause tripping hazards.
-
Tile Slump: Heavy large-format tiles and wall tiles tend to sink or slide down while the wet cement cures. The wedges lock the tiles tightly in place, preventing any movement overnight.
-
Tile Warpage (Bowing): Long wood-look planks naturally curve or bow in the middle during their firing process. A strong leveling system pulls these bowed edges flat against the neighboring tiles.
What It CANNOT Fix (The SLU Rule)
-
Uneven Subfloors: This is the golden rule of tile installation. A tile leveling system cannot fix a sloped, wavy, or heavily pitted subfloor. If your concrete slab has major dips or humps, you cannot use leveling clips to pull a tile over a massive gap. Doing so leaves the tile unsupported (hollow spots), which guarantees the tile will crack when walked on. Furthermore, forcing a clip to handle massive height differences will cause the plastic base to snap prematurely.
The Pro Fix: You must prep your floor first. Always use a Self-Leveling Underlayment (SLU) or grind down the high spots on your concrete before you start spreading thinset.
The 3 Core Components of a Professional System
Not all leveling systems are created equal. When a contractor tells us a system “doesn’t work,” 90% of the time, it is because they bought cheap, poorly manufactured tools. A professional tile leveling system relies on three perfectly engineered components working together.
Here is what you need to look for before buying or stocking these tools.
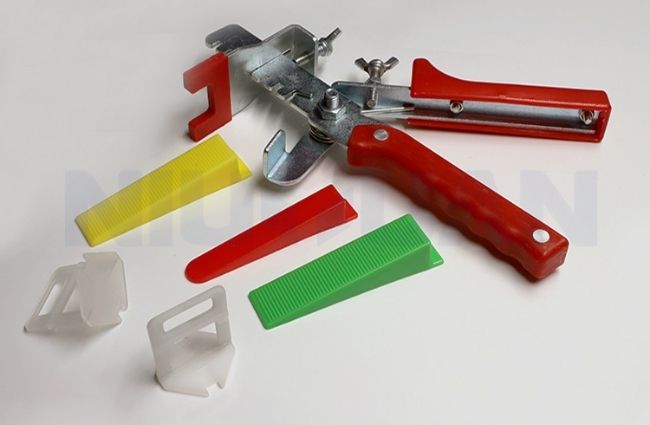
1. The Leveling Clips (Spacers / Bases)
The clip is the backbone of the entire system. It acts as both a spacer to define your grout line (typically 1mm, 1.5mm, 2mm, or 3mm) and an anchor beneath the tile.
The Manufacturer’s Secret: The most critical part of the clip is the break-off point near the base.
-
The Problem: Cheap clips are made from recycled plastics. They have unpredictable tensile strength. They either snap prematurely while you are tightening them, or they stretch and refuse to break cleanly the next day, leaving ugly plastic stubs in your grout lines.
-
The Solution: We engineer our clips using 100% virgin Polypropylene (PP). This ensures the clip has extreme pulling strength during installation, but snaps off crisply and completely flush with the subfloor when kicked from the side.
2. The Reusable Wedges
While the clips are single-use, the wedges are your long-term investment. They slide into the clip and physically push the higher tile down to match the lower one.
-
Deep Serrations (Gear Teeth): A professional wedge features deep, sharp ridges. When the plier pushes the wedge in, these teeth lock into the clip securely. Poorly made wedges have shallow teeth that slip backward under pressure, causing the tile to pop back up overnight.
-
High-Impact Durability: Our wedges are molded from heavy-duty plastic designed to withstand hundreds of hammer strikes and plier compressions without wearing down. You buy them once and reuse them for dozens of jobs.
3. The Adjustable Installation Pliers
You can push the wedges in by hand on a small backsplash, but for a full floor, you need the pliers. Pliers save your thumbs and provide massive, consistent pressure.
-
Micro-Adjustments: A good plier has an adjustable screw. You set the exact stopping distance based on your tile thickness. This prevents workers from squeezing too hard and accidentally tearing the clip out of the wet cement.
-
Metal vs. Plastic: Always opt for tools with a heavy-duty steel frame and ergonomic grips for large-scale contracting work.
6 Steps to Use a Tile Leveling System Properly
Let’s get to the actual installation. Here is the exact, factory-recommended process to achieve a perfectly flat floor without snapping clips prematurely or trapping mortar in your grout lines.
Step 1: Prep the Floor and Spread Thinset
Always start with a flat subfloor (remember the SLU rule from earlier). Use a notched trowel to spread your thinset mortar in straight, directional lines—never in swirls.

Pro Tip: If you are installing large-format tiles, always back-butter the tile (apply a thin layer of mortar to the back of the tile itself). This guarantees 100% coverage and prevents the tiles from cracking under heavy foot traffic later.
Step 2: Position the Leveling Clips
Slide the base of the disposable clips under the edge of your first tile.

The 2-Inch Rule: Never place a leveling clip exactly on the corner of a tile. Always position your clips about 2 inches (50mm) inward from the corners. Placing clips directly on the corners starves the corners of mortar, creating weak, hollow spots that easily chip.
Step 3: Lay the Adjacent Tile
Place your second tile down, pushing it snugly against the clips. The clips are now acting as your tile spacers, keeping the grout lines perfectly straight. Use a rubber mallet to gently tap the tile down. This releases any trapped air in the thinset and gives you a solid bond.
Step 4: Insert the Wedges and Tighten
Slide the reusable plastic wedge into the opening of the clip. Grab your adjustable installation pliers and squeeze the wedge inward until both tile surfaces are perfectly flush.

Warning: Do Not Overtighten! The pliers provide massive leverage. If you squeeze too hard, you will rip the clip right out of the wet cement or snap it in half. Set the adjustment screw on your pliers to the correct depth for your tile thickness and stick to that setting.
Step 5: Clean the Grout Lines Immediately (Do Not Skip)
This is where 80% of installation failures happen. When you tighten the wedge, wet thinset often squeezes up into the grout joint.
You must clean this excess cement out immediately using a damp sponge, a putty knife, or a traditional cross spacer. If you let the mortar harden around the base of the clip overnight, it will trap the break-off point. The clip will refuse to break cleanly the next day, forcing you to scrape melted plastic out of dry cement.
Step 6: Let It Cure and Remove Correctly
Wait at least 24 hours for the thinset to fully cure (always check your mortar bag for exact drying times). Once the floor is rock solid, it is time to remove the top half of the system.

The Golden Rule of Removal: Always strike the clip exactly parallel to the grout line. Use a rubber mallet or kick it with your steel-toe work boots. Never hit the clip from the side (perpendicular to the joint). A parallel strike ensures our virgin PP plastic snaps cleanly at the hidden base, leaving your grout lines totally empty and ready for finishing. Gather up your wedges—they are ready for your next job.
Special Case: Laying Wood-Look Planks and Large Format Tiles
Standard 12×12 inch tiles are easy. But today’s market is dominated by large-format tiles and long wood-look planks. These modern styles come with a hidden physical flaw that only a leveling system can fix.
-
The Bowing Effect: During the kiln-firing process, long porcelain planks (like 8″x48″) naturally warp. The center of the tile bows upward. If you lay them with a standard 33% offset (brick pattern), the high center of one plank sits directly next to the low ends of the adjacent planks. This creates massive lippage.
-
The Solution: You must use more clips on the long edges. We recommend placing a leveling clip every 8 to 10 inches along the long side of a wood-look plank. The wedges will physically pull the bowed center flat against the ends of the neighboring tiles.
Clip Coverage Calculator: How Many Do You Need?
A common question we get from both contractors and wholesale buyers is calculating order quantities. The number of clips you need depends entirely on the size of your tile. Smaller tiles require more clips per square meter.
Here is a quick factory reference chart to help you estimate your clip usage:

| Tile Size (mm) | Tile Size (Inches) | Estimated Clips per m2 | Estimated Clips per ft2 |
| 300 x 600 mm | 12″ x 24″ | 22 clips | 2 clips |
| 600 x 600 mm | 24″ x 24″ | 11 clips | 1 clip |
| 200 x 1200 mm | 8″ x 48″ | 25 clips | 2.5 clips |
| 800 x 800 mm | 32″ x 32″ | 7 clips | 0.6 clips |
(Note: Wedges are reusable. For a standard room, you typically only need to buy 1 wedge for every 3 or 4 disposable clips, depending on how much you tile in one day.)
Frequently Asked Questions (FAQs)
Q: Do I still need traditional tile spacers if I use a leveling system? A: In most cases, no. Our leveling clips are designed with built-in spacer thicknesses (such as 1.5mm or 2mm). The clip itself acts as the spacer. However, if you want a much wider grout joint (like 5mm), you can use traditional cross spacers alongside the leveling clips.
Q: Can I reuse the leveling clips and wedges? A: The plastic wedges are highly durable and 100% reusable for dozens of jobs. The leveling clips (bases), however, are strictly single-use. The top half breaks off after the mortar cures, and the bottom plate remains permanently buried under the tile.
Q: Can a tile leveling system be used on walls? A: Absolutely. In fact, it is highly recommended for large wall tiles. The clips and wedges lock the tiles together, preventing heavy wall tiles from slipping downward while the thinset cures overnight.
Q: What happens if the thinset dries around the clip? A: This is the most common installation error. If excess cement hardens around the break-off point of the clip, it will not snap cleanly. You must scrape out wet mortar from the grout lines immediately after tightening the wedges.
Partner With a Reliable Tile Tools Manufacturer
Achieving a flawless, lippage-free floor is simple when you combine the right technique with premium, perfectly engineered tools. Whether you are a contractor tired of snapping cheap clips, or a building materials distributor looking for a dependable supplier, quality matters.
At NIUYUAN, we bring over a decade of manufacturing expertise to every tile accessory we produce. We do not cut corners with recycled plastics. Our leveling clips are molded from high-strength virgin PP to guarantee a secure hold and a perfectly clean break every single time.
Looking to upgrade your supply chain? We support bulk orders, OEM custom packaging, and strict quality control for B2B export.