The stair nosing is the material installed on the front edge of each step. It not only helps protect the edge of the stairs from wear and tear but also provides additional traction to prevent slipping and falling. Whether you’re upgrading your residence or enhancing a commercial space, proper installation is key to achieving lasting results.
This article will introduce you to the process of installing stair nosing, an important step in improving stair safety and aesthetics. Let’s get started to make your stair project safer and more visually appealing!
Preliminary
Choosing the Right Type and Material
Before beginning installation, choosing the appropriate stair nosing material is a crucial step. Depending on your stair material and usage requirements, you can choose from the following types of stair nosing:
- Bullnose stair nosing: This type of stair nosing features a rounded front edge, suitable for most home environments.
- Heavy duty anti-slip stair nosing: Ideal for high-traffic areas, especially where additional slip protection is needed.
- Infill stair nosing: This type typically comes with replaceable strips, making it convenient for future replacements or updates.
- Single or double channel stair nosing: This design allows for additional inserts, such as anti-slip strips or visual indicators.
- Ramped Edge stair nosing: Designed with a sloped edge, suitable for wheelchair access and reducing tripping hazards.
When selecting stair nosing, it’s also important to consider the type of existing floor covering, as this will affect the installation method and material selection. These coverings may include:
- Tiles
- Carpet
- Wood
- Metal
- Cork
- Rubber
- Laminate materials
When choosing materials, consider the environment of the stairs (indoor or outdoor), traffic flow (home use or public spaces), and your budget.
Tools and Materials List
Prepare the following tools and materials to ensure a smooth installation process:
- Tape measure
- Pencil
- Stair nosing kit
- Hammer
- Caulk gun and adhesive caulk
- Steel saw or tin snips (for cutting materials, depending on the type of stair nosing selected)
- Electric drill and drill bit set (for pre-drilling holes and securing screws)
- Screws or nails (choose according to the installation requirements of the stair nosing)
- Metal file
- Safety glasses and gloves
Ensuring all tools and materials are complete can help avoid unnecessary interruptions during the installation process.
Preparing Surfaces for Stair Nosing
Before installing the stair nosing, it’s essential to thoroughly clean the surface of the stairs, removing all dust and debris. For surfaces with grease or stains, use a cleaner to wash and allow it to dry completely. Next, inspect the stairs for any cracks or indentations, repair them with appropriate filler, and ensure the surface is smooth. Finally, lightly sand and clean the surface of the stairs with a damp cloth to improve the adhesive bonding of the nosing. Ensuring the surface is dry and dust-free is a crucial step that helps ensure the secure installation of the nosing.
How to Install Stair Nosing?
Measuring Stairs
Before beginning the installation, accurately measuring the length and width of the stairs is crucial. Use a tape measure to measure the front edge of each step, which is where the stair nosing will be installed. Make sure to record the dimensions of each step, as each step of the stairs may vary slightly. Failure to measure accurately could result in incorrect cutting of the stair nosing length.
Cutting Stair Nosings
After measuring and marking the dimensions of the stair nosing, choose the appropriate tools for cutting. For metal stair nosing, a steel saw is the best choice. If the stair nosing is made of wood or plastic, you can use a steel saw or tin snips. During the cutting process, pay special attention, especially with metal materials, as sharp burrs may form along the edges. After cutting, inspect the edges of the cut. If there are burrs, carefully file them smooth with a metal file to ensure smooth edges.
Dry-Fit Stair Nosings
Before proceeding with the actual installation, conduct a dry fit by placing the cut stair nosing snugly against the front edge of the stair tread to check for fit. This step is crucial as it helps identify any sizing errors and ensures precise alignment during installation. If necessary, make minor adjustments by trimming to achieve the best fit.
Pre-Drilled Pilot Holes
When installing stair nosing on wooden or tiled stairs, it’s necessary to pre-drill pilot holes at the marked positions for the nosing. This helps prevent wood or tile from cracking during installation. Use an electric drill with a drill bit that matches the size of the screws, ensuring each pilot hole is in the correct position. This step helps ensure that the screws can be smoothly and evenly installed, enhancing the overall stability of the structure.
Tips: If you need to install nails on tiles, use a specialized tile drill bit or masonry drill bit to drill a hole with the same diameter as the nails. Ensure that drilling is done only on the tiles, and the depth of the holes does not exceed the thickness of the tiles themselves.
Adding Adhesive Caulk
While many stair nosings come with self-adhesive tape, applying a layer of adhesive caulk to the bottom of the nosing helps waterproof and moisture-proof. It also adds additional adhesive strength, ensuring a more secure attachment to the stair surface. You need to ensure even application and avoid sealant overflow onto the surface.
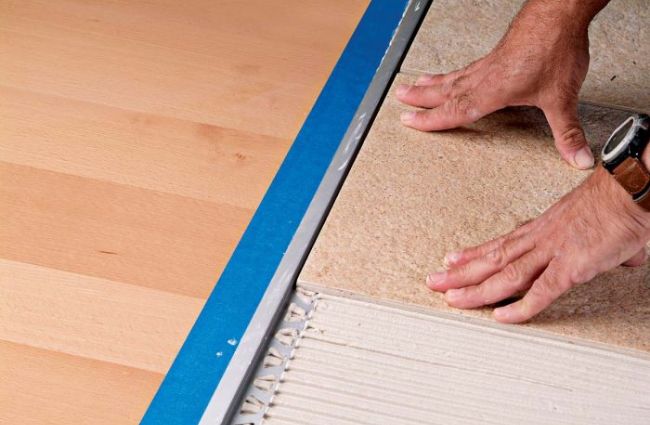
Fixed Stair Nosings
Place the prepared stair nosing in its final installation position and secure it with nails or screws. After fixing the stair nosing, immediately clean off any excess adhesive to maintain high-quality stair edges. Finally, inspect each step to ensure they are level and securely fixed.
When to Call a Professional
During DIY installation of stair nosing, encountering special materials such as stone or complex stair structures may require professional expertise and tools. In such cases, it’s best to consult with professionals to ensure the safety and accuracy of the installation.
If safety issues arise during installation, such as unstable stairs, or if specific laws and building codes need to be adhered to, hiring professionals should also be considered. Their expertise can help avoid potential legal issues and safety risks, ensuring that the installation meets all relevant standards and requirements.
Conclusions
When undertaking a DIY installation, it’s important to recognize one’s own abilities and seek professional help when necessary. This ensures not only the quality of the installation but also avoids unnecessary safety hazards. Whether installing on your own or with professional assistance, correctly installing stair nosing will make your stairs safer, more aesthetically pleasing, and more durable.
FAQs
Q1. What if the stair nosing I installed is not the right length?
First, remeasure the dimensions of the stairs to confirm the exact length required. If the stair nosing is too long, use the appropriate saw to recut it to the correct length. If it is too short, you may need to purchase new materials and cut them to the correct size.
Q2. What should I do if my stair nosings feel unstable after installation?
Check that all fastening screws are securely tightened. If the screws are tight but the nosing still feels loose, you can add washers under the screws to increase the tightening force. Additionally, ensure that the screws you are using are suitable for the material and thickness of your stairs.
Q3. What should I do to avoid cracking the material when cutting stair nosings?
Use a saw blade suitable for the material, and ensure the blade is sharp. For materials prone to splitting, apply a layer of clear tape along the cutting line before cutting to reduce the risk of cracks. Additionally, adjust the saw’s speed to a lower setting to reduce pressure on the material.
Q4. How do you fix the surface of an accidentally scratched stair noggin?
For minor scratches, you can use a touch-up pen or wax that matches the color of the stair nosing to cover them. For deeper scratches or damage, you may need to fill and level them with wood putty or filler in the corresponding color, then gently sand and repaint.
Q5. What type of maintenance is required after a stair nosing is installed?
After installing stair nosing, regularly check the fasteners for any loosening, especially in high-traffic areas. If screws are found to be loose, tighten them promptly. To maintain appearance and slip resistance, regularly clean the surface of the nosing, avoiding the use of abrasive cleaners to prevent surface damage.