
Planning a tiling project? You’ve likely encountered two essential components: tile trim and grout. While both are vital for a finished look, they serve completely different functions, and knowing the difference is crucial.
Tile edging is primarily used to protect and decorate the exposed edges of tile installations, while grouting is primarily used to fill the gaps between tiles.
They are not interchangeable, and using them correctly is key to a professional, long-lasting result. This guide will quickly clarify what tile trim and grout are, their specific jobs, and exactly when and where you need to use each one in your project. Let’s clear up the confusion.
What is Tile Trim? (The Edge Finisher)
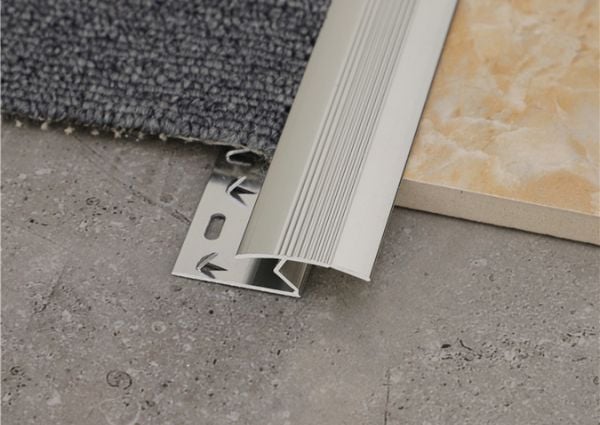
First things first, what exactly is tile trim? Think of it as a specialized finishing strip designed specifically for the edges of your tiled areas. You might also hear it called tile edging, an edge profile, or sometimes a transition strip. Essentially, it acts like a frame for your tile work, giving it a clean, finished look.

But it’s not just about looks. Tile trim serves three very important functions:
- 1. Protects Vulnerable Edges: Cut tile edges can be sharp and easily chipped or cracked. Tile trim covers these vulnerable edges, acting as a shield (protect tile edge) and making your tile job last longer.
- 2. Delivers a Polished Look: Instead of leaving an unfinished tile edge (often showing the tile body and adhesive), trim provides a clean, straight line. This instantly makes the project look more high-end and complete.
- 3. Creates Smooth Transitions: Whether your tile meets drywall, carpet, wood floors, or simply turns an outside corner, tile trim helps create a smooth, safe, and visually appealing transition between the different surfaces or angles.
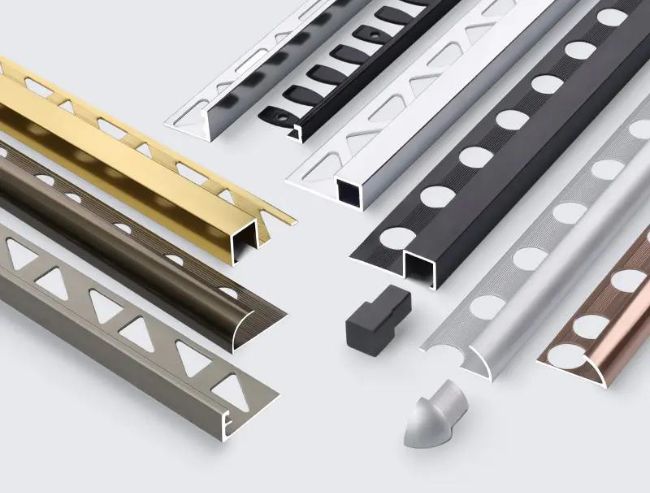
You have choices when it comes to tile trim. It’s available in several materials, allowing you to match your style, budget, and the demands of the location:
- PVC (Plastic): Often the most affordable choice (PVC tile trim). It’s easy to cut and comes in many colors, though it might not be as tough as metal options.
- Aluminum: A very popular, versatile option (Metal tile trim). It’s lightweight, won’t easily corrode, and comes in various finishes (like brushed metal, polished chrome, or different colors).
- Stainless Steel: Extremely durable and resistant to scratches, stains, and moisture (Metal tile trim). It’s ideal for high-traffic floors or wet areas and provides a sleek, modern look.
- Brass: Gives off a more classic or luxurious vibe. It’s strong but may require occasional polishing to maintain its shine, depending on the finish.
Besides material, you’ll also find different shapes or profiles:
- Round Edge: Offers a softer, curved edge finish.
- Square Edge: Provides a crisp, clean, right-angle look (often L-shaped).
- Quadrant: A quarter-circle shape, often used for subtle edging or internal corners.
So, where do you actually use tile trim? Common spots include:
- Outside corners on walls (like the edge of a shower or a pony wall).
- The top or side edge of a backsplash or partially tiled wall.
- Where a tile floor meets another type of flooring (like carpet or hardwood).
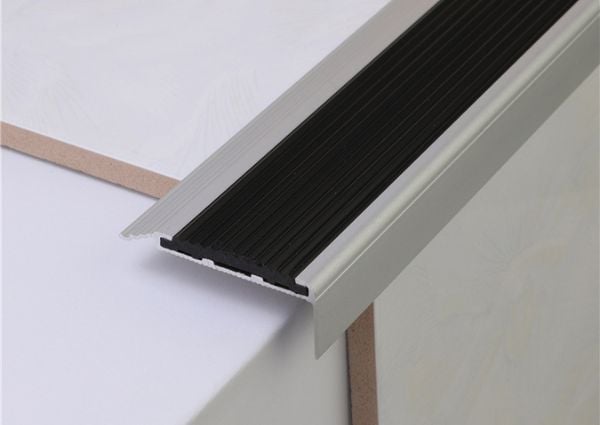
- Along the edge of tiled steps or around bathtub platforms.
- Neatly framing recessed shower niches.
What is Grout? (The Gap Filler)
Now that we understand tile trim handles the edges, let’s focus on grout. What is its job? Simply put, grout is the paste-like material used specifically to fill the gaps or joints between individual tiles after they’ve been set in place. Think of it as the connector that locks all your separate tiles together into one cohesive, solid surface.

While it might just look like filler, grout plays several vital roles in any tile installation:
- Fills the Necessary Gaps: Tiles aren’t installed edge-to-edge; small gaps (grout lines) are intentionally left. Grout’s primary, most visible purpose is to completely fill these spaces.
- Provides Stability and Strength: By filling the joints, grout locks the tiles together, preventing them from shifting, rubbing against each other, or cracking under pressure. It adds significant rigidity to the entire tiled area.
- Seals and Protects: Properly installed grout acts as a barrier. It helps prevent water, dirt, spills, and grime from getting down into the gaps and underneath the tiles. This is crucial for preventing water damage, mold growth, and ensuring the longevity of the installation, especially in kitchens and bathrooms.
- Contributes to the Final Look: Don’t underestimate grout’s aesthetic impact! It comes in a vast range of colors. You can choose a color that blends seamlessly with your tile for a uniform look, or select a contrasting color to highlight the tile shape and pattern, making the grout lines part of the design.
It’s also important to know that there isn’t just one type of grout. The main grout types you’ll encounter are:
- Cementitious Grout: The most common and traditional type (cement grout). It’s a powder (usually Portland cement, fillers, and pigments) that you mix with water.
- Sanded Grout: Contains fine sand particles for added strength and reduced shrinkage. It’s used for wider grout joints, typically 1/8 inch (3mm) or larger.
- Unsanded Grout: Contains no sand. It’s used for narrower joints (less than 1/8 inch) and is preferred for delicate tiles like polished stone or glass that could be scratched by sand.
- Epoxy Grout: This type uses epoxy resins instead of cement (epoxy grout). It’s highly resistant to stains and water (waterproof grout characteristics – though technically it’s extremely water-resistant, not fully waterproof itself), making it very durable and great for demanding areas like shower floors or kitchen counters. However, it’s typically more expensive and can be more challenging to work with than cement grout.
- Urethane Grout: Often comes pre-mixed. It offers good stain resistance and flexibility (less prone to cracking) and can be easier to use than epoxy, though sometimes requires longer drying times.
So, where do you absolutely need grout? The rule is straightforward: Grout is used in the joints between practically all adjacent tiles. Any surface covered in tile – whether it’s a floor, wall, countertop, backsplash, or shower area – requires grout to fill the spaces between the individual tiles.
Tile Trim vs. Grout: The Key Differences Summarized
Now that we’ve looked at tile trim and grout individually, let’s put them head-to-head to clearly summarize their distinctions. Understanding these key differences is crucial for planning your tiling project and ensuring you use each material correctly. The core message: they are fundamentally different and serve separate purposes.
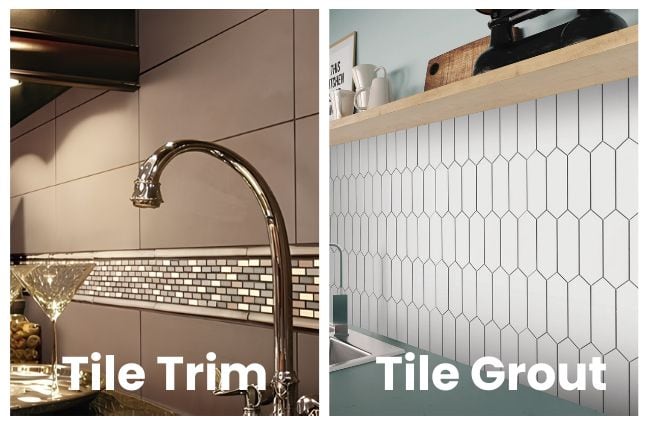
Here’s a quick comparison table highlighting the main points of tile trim vs grout:
| Feature | Tile Trim | Grout |
|---|---|---|
| Primary Job | Finishing & Protecting Exposed Tile Edges | Filling Gaps/Joints Between Tiles |
| Location | Perimeter, Outer Edges, Corners, Transitions | Spaces/Lines Between Adjacent Tiles |
| Main Function | Edge Protection, Clean Look, Smooth Transition | Tile Stability, Sealing Gaps, Aesthetics |
| Material Form | Solid Strips (e.g., Metal, PVC) | Powder mixed with liquid, or Pre-mixed Paste |
| Installation | Typically installed with the tile | Applied after tiles are set & adhesive cures |
| Interchangeable? | No | No |
Let’s elaborate on these crucial distinctions:
- Completely Different Functions: This is the most important takeaway. Tile trim (or tile edging) and grout are designed for entirely separate tasks. Trim specifically addresses the outer edges of your tiled area – protecting them and making them look neat. Grout’s sole purpose is to fill the spaces between the tiles within that area. You cannot use grout effectively to finish an edge, and you certainly wouldn’t use trim to fill the joints between tiles.
- Specific Placement: Think about where you actually see them in a finished project. Tile trim is found only on the boundaries – outside corners, the edge where tile stops against a painted wall, where a tile floor meets carpet, or around features like shower niches. Grout, conversely, is present throughout the main field of tile, forming the grid lines between every single adjacent tile.
- Material Form & Installation Timing: Their physical forms are distinct – trim pieces are rigid strips, while grout is a paste applied using a float tool. This also dictates when they are installed. Trim is typically embedded in the tile adhesive as the tiles are being laid. Grout application happens later, only after the tile adhesive has fully cured and the tiles are firmly set.
- Necessity: While both contribute to a professional finish, their necessity differs slightly. Grout is virtually always required between tiles for structural integrity and protection against moisture and debris. Tile trim is essential for protecting exposed edges and providing a finished look in those areas, although sometimes alternative methods like using ‘bullnose’ tiles (tiles with a built-in curved edge) can be used instead of separate trim pieces.
Understanding these core differences between tile trim and grout ensures you purchase the right materials and use them in the right places for a successful, long-lasting tile installation.
Pros and Cons: Weighing Your Options for Tile Trim and Grout
To make fully informed decisions for your tiling project, it helps to weigh the specific advantages and disadvantages of both tile trim and grout.

Tile Trim
- Pros:
- Excellent Edge Protection: It’s the number one benefit. Trim effectively guards fragile, cut tile edges against chipping, cracking, and everyday wear and tear, significantly extending the life of your installation.
- Clean, Professional Finish: It provides a neat, crisp edge that looks deliberate and high-end, successfully hiding the less attractive raw edge of the tile and the adhesive layer. Essential for many modern design aesthetics.
- Wide Variety of Styles & Materials: From affordable PVC tile trim in various colors to sleek metal tile trim (aluminum, stainless steel) in different finishes, and classic brass, there’s a trim to match virtually any tile and decor style. Profiles range from rounded to sharp square edges.
- Hides Minor Imperfections: A well-chosen trim can sometimes help conceal slightly uneven or chipped tile cuts along an edge, leading to a cleaner result.
- Creates Smooth & Safe Transitions: Trim pieces, especially tile transition strips, ensure a safer and more visually appealing transition between different flooring types or levels.
- Cons:
- Adds Cost: Tile trim is an additional material expense that needs to be factored into your project budget. Metal trims, in particular, can be relatively costly compared to basic PVC.
- Requires Careful Installation: Cutting trim accurately (especially metal) and setting it correctly requires precision, the right tools (like a miter box or specialized cutter), and careful alignment during tile installation.
- Style is a Commitment: The profile and finish of the trim you choose significantly influence the overall look. Once it’s installed under the tile, changing it is a major undertaking.
- Can Be Damaged: While designed for protection, trim itself (especially softer aluminum or PVC) can sometimes get dented, scratched, or bent with heavy impact. Replacing a damaged piece embedded under tile is difficult.
Grout
- Pros:
- Essential for Stability & Protection: Its core function – grout locks tiles together, preventing movement, and crucially seals the joints against water, dirt, and bacteria. It’s fundamental to the integrity of the installation.
- Neatly Fills All Gaps: Provides a consistent, uniform fill for all the spaces between tiles, contributing to a cohesive and finished appearance across the entire surface.
- Huge Range of Color Options: Grout is available in nearly every color imaginable, allowing you to perfectly match your tile, create a subtle contrast, or make a bold design statement with the grout lines.
- Relatively Inexpensive (Cementitious): Standard cement grout (both sanded and unsanded) is generally one of the most budget-friendly components of a tiling project.
- Cons:
- Can Stain or Discolor (Especially Cementitious): Traditional cement-based grouts are porous and can absorb spills (wine, coffee, oil) or simply become dirty and discolored over time, particularly with lighter grout colors in high-traffic or wet areas.
- Requires Sealing & Maintenance (Cementitious): To minimize staining and water absorption, cement grout usually needs to be sealed after installation and potentially resealed periodically (e.g., annually) depending on the location and use.
- Potential for Cracking: Grout can sometimes crack if there’s significant movement or shifting in the underlying structure (subfloor/walls), or if it was mixed improperly or cured too quickly.
- Installation Can Be Messy: Applying grout involves spreading it over the tiles and requires careful, timely cleanup to avoid leaving a haze on the tile surface or staining porous tiles.
- Choosing the Right Type is Crucial: Using the wrong kind of grout (e.g., sanded grout on easily scratched polished tiles, or basic grout in a constantly wet shower floor) can lead to aesthetic issues or premature failure. Performance grouts like epoxy grout mitigate some cons (staining, sealing) but come with higher cost and different installation challenges.
Are There Alternatives to Trim and Grout?
While tile trim and grout are the standard, go-to materials for finishing edges and filling joints in most contemporary tiling projects, it’s worth briefly touching upon a couple of alternatives or related options you might encounter or consider for specific situations.
Alternatives for Finishing Edges (Instead of Tile Trim):
- Bullnose Tile:
- What it is: Before tile trim became ubiquitous, bullnose tile was the traditional method for finishing an edge. A bullnose tile is simply a piece of field tile that has one or two edges factory-finished into a smooth, rounded curve.
- When it’s used: It’s installed along exposed edges instead of a separate trim piece, providing a cohesive look using the same tile material.
- Limitations: The main drawbacks are availability and style. Not all tile collections offer matching bullnose pieces, and you’re typically limited to a rounded edge profile, which may not suit designs calling for a sharper, square finish easily achieved with metal tile trim.
- Polished or Finished Stone Edge:
- What it is: For some natural stone tiles (like marble, granite, or travertine), a skilled installer can sometimes cut, shape (profile), and polish the exposed edge of the stone itself. This creates a finished edge without needing a separate trim piece.
- When it’s used: Primarily with thicker stone tiles where the material allows for shaping and polishing.
- Limitations: This requires specialized tools, significant skill, and extra labor (adding to the cost). It’s not an option for standard ceramic or porcelain tiles.
“Alternatives” for Filling Joints (Specifically: Caulk vs. Grout):
This is where clarity is crucial. Flexible caulk (sealant) does not replace grout for filling the main joints between tiles across the flat surface of your wall or floor. Grout is essential there for rigidity and properly filling the space.
However, caulk is the correct material to use instead of grout in specific types of joints where flexibility is needed:
- At Changes of Plane: Use caulk in corners where two tiled surfaces meet (e.g., wall-to-wall corners inside a shower, or where a tiled wall meets a tiled floor). These areas experience slight movement, and flexible caulk will accommodate it, whereas rigid grout would likely crack over time.
- Where Tile Meets Different Materials: Use caulk to seal the joint where tile butts up against other items or surfaces, such as:
- Around bathtubs and shower bases/trays.
- Where a tiled backsplash meets the countertop.
- Where tile meets a sink basin.
- Around window frames or door casings adjacent to the tile.
Why use caulk in these spots? Because caulk remains flexible after curing, it creates a watertight seal while allowing for the minor expansion, contraction, or movement that occurs between different materials or structural planes. Grout is too rigid for these applications. (This is the core of the grout vs caulk distinction.)
In Summary:
While options like bullnose tiles exist for certain edge situations, and caulk is essential for flexible joints, tile trim and grout remain the primary, most versatile, and widely applicable solutions for achieving a complete, protected, and professional finish in the vast majority of modern tile installations.
Conclusion
The secret to leveraging both materials effectively often lies in careful planning. Before you begin setting your tiles, take the time to identify all the areas where edges will be exposed. Select a tile trim profile, material, and color that not only protects those edges but also complements your tile choice and overall design vision. Simultaneously, consider the demands of the environment (wet vs. dry, high traffic vs. low traffic) and your aesthetic goals when choosing the appropriate grout type and color.
If your project requires a large quantity of tile trim or epoxy grout in the near future, please feel free to contact us. We will provide you with high-quality tile trim and epoxy grout at competitive prices.
Frequently Asked Questions
Here are answers to some common questions that often come up when discussing tile trim and grout:
Q1: Can I just use grout to finish a tile edge instead of using tile trim?
A: Generally, no. Grout is formulated to fill the joints between tiles on the same plane, providing compressive strength within the joint. It’s not designed to cap off an exposed edge, lacks the structural strength and impact resistance needed for edge protection, and doesn’t adhere well in that type of application. Attempting to use grout as an edge finish will likely result in it chipping, cracking, looking messy, and failing to protect the tile edge effectively. Tile trim is specifically designed for this purpose.
Q2: Do I absolutely have to use tile trim on every project?
A: Not necessarily on every single edge in a room, but it’s strongly recommended for most exposed edges for durability and a clean look. For example, if an edge terminates neatly against a wall and can be sealed with caulk, you might omit trim there. Similarly, if your chosen tile line offers matching bullnose tiles (tiles with a factory-finished rounded edge), those can serve as an alternative to separate trim pieces. However, for critical areas like outside corners, floor transitions (tile transition strips), and most exposed wall tile terminations (like backsplash ends), tile trim provides superior protection and a more reliably professional finish.
Q3: Is tile trim difficult for a DIYer to install?
A: It adds a layer of complexity compared to just setting field tiles, mainly because it requires precision. Accurate measurements are key, and you’ll need to make clean, straight cuts, especially for 45-degree miters at corners. Cutting metal tile trim requires appropriate tools – a miter saw with a suitable blade for non-ferrous metals often gives the best results, though a fine-toothed hacksaw and miter box can also work with patience. PVC tile trim is considerably easier to cut. While it requires care and the right tools, many DIYers find installing tile trim manageable with proper preparation.
Q4: What’s the main difference between sanded and unsanded grout again?
A: It boils down to the presence of sand particles in the mix:
- Sanded Grout: Contains sand, which adds strength and helps reduce shrinkage. It’s used for wider grout joints, typically 1/8 inch (3mm) or larger.
- Unsanded Grout: Lacks sand, resulting in a smoother texture. It’s used for narrower grout joints (less than 1/8 inch) and is the preferred choice for tiles that scratch easily, such as polished natural stone (marble, travertine), glass tiles, or metal tiles.
Q5: How long should grout last? Does it need replacing?
A: High-quality grout that is properly mixed, installed, and maintained can last for many years, potentially even decades. However, its longevity and appearance depend heavily on several factors:
- Grout Type: Epoxy grout is inherently more durable, stain-resistant, and water-resistant than standard cement grout.
- Location & Use: Grout in high-traffic areas or constantly wet environments (like shower floors) will endure more stress than grout on a low-use decorative wall.
- Maintenance: Regular cleaning is essential. Cementitious grout typically benefits from being sealed after installation and potentially resealed periodically (e.g., every 1-2 years) to maintain stain and moisture resistance.
If grout becomes deeply stained beyond cleaning, significantly cracked, or starts crumbling out of the joints, then regrouting (the process of removing the old grout and applying new grout) might be necessary to restore the appearance and integrity of the tile installation.