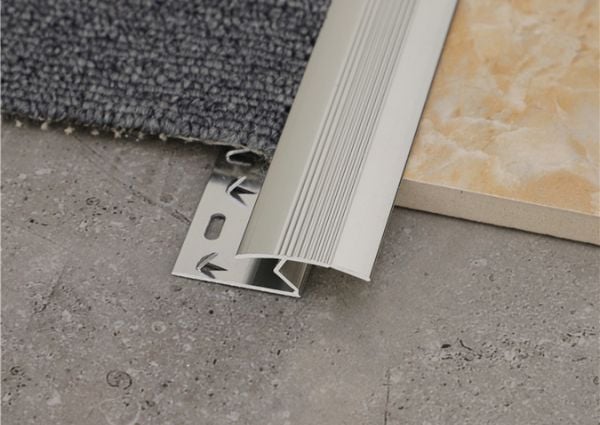
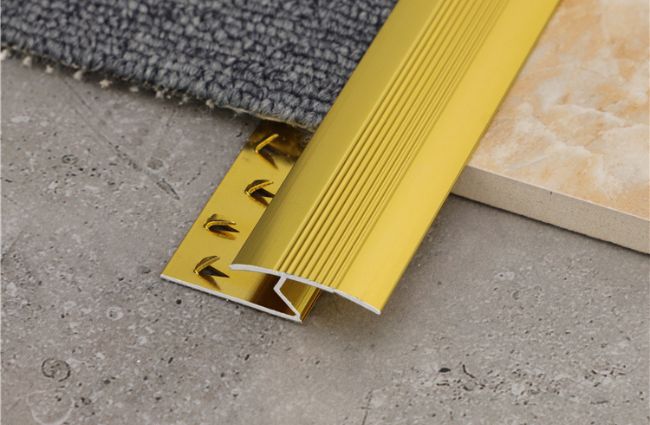
My old carpet met new tile, and suddenly, I had a gap. It looked unfinished, even unsafe. Did I really need something there?
Yes, you almost always need a transition strip between carpet and tile. These strips bridge the height difference, cover unsightly gaps, and protect the edges of both flooring materials. They also create a clean, finished look and prevent tripping hazards.
I remember staring at that awkward divide, wondering if I could just ignore it. But the more I looked, the more I realized it was a problem that needed a solution. It wasn’t just about looks; it was about protecting my flooring and preventing trips.
Should There Be a Transition Piece Between Carpet and Tile?
My flooring project was almost done, but a crucial question lingered: should I actually put something between the carpet and the tile? I had to find out.
Absolutely, there should be a transition piece between carpet and tile. This piece, often called a transition strip or reducer, is essential for a smooth and safe connection. It hides the raw edges and protects your flooring from wear and tear.

When I first considered the transition, I thought it was just for aesthetics. But as I dug deeper, I learned its purpose goes beyond just looking good. It’s about preserving the life of your floors and ensuring safety.
Why a Transition Piece is Important
Having a transition piece is more than just a preference; it is a necessity for many reasons. Think about the daily life of your floors. They get walked on, cleaned, and sometimes things get dropped. A transition piece acts like a shield.
| Benefit | Description |
|---|---|
| Protects Edges | The edges of carpet can fray and tile can chip without protection. A transition strip keeps these edges safe from damage. |
| Hides Gaps | There is almost always a small gap where two different flooring types meet. The strip covers this gap, making the line clean and even. |
| Reduces Tripping | Carpet and tile often have different heights. A good strip smooths out this difference, making it less likely someone will trip. |
| Improves Appearance | An unfinished edge looks messy. A transition strip gives a professional and clean finish to your floor layout. |
| Prevents Wear | Over time, heavy traffic at the seam can cause both carpet and tile to break down. The strip helps spread the load and stop this early wear. |
I quickly learned that these pieces are not just an add-on; they are a vital part of a well-installed floor. They extend the life of both your carpet and your tile, which saves money in the long run.
What Do You Put Down Between Carpet and Tile?
I was at the hardware store, staring at rows of options. What exactly do you put down between carpet and tile to make it look right and last?
You put down a transition strip, which is a specialized piece of molding designed to bridge the gap and height difference between carpet and tile. Common types include Z-bars, carpet reducers, and T-molding, each serving specific purposes for a smooth transition.

It can feel overwhelming with all the choices out there. I quickly realized that picking the right type of strip was as important as installing it correctly. Each kind has its own job, and knowing which one to use made my project much simpler.
Choosing the Right Transition Strip
Selecting the proper strip depends on factors like the height difference and how much traffic the area gets. I found that understanding the common types made my decision easier.
Z-Bar
A Z-bar is specifically made for carpet. It has a ‘Z’ shape that grips the edge of the carpet. It is often used when the carpet meets a hard surface that is at the same or slightly lower height.
| Feature | Description |
|---|---|
| Shape | Shaped like the letter ‘Z’. |
| Use | Grips carpet edge. Good for same-level or slightly lower hard surfaces. |
| Material | Usually metal, like aluminum. |
| Installation | Secured to the subfloor, then carpet is tucked into the ‘Z’ channel. |
I used a Z-bar in my hallway where the carpet met a low-profile tile. It made the carpet edge completely disappear and gave a very clean line.
Carpet Reducer
A carpet reducer helps to smooth a height difference. It has a sloped profile. It works well when the carpet is thicker than the tile, or when the tile is slightly higher.
| Feature | Description |
|---|---|
| Shape | Sloped or ramped. |
| Use | Reduces height differences between carpet and tile. |
| Material | Can be wood, metal, or vinyl. |
| Installation | Fastened to the subfloor, with the carpet butted against the sloped edge. |
For my living room, where the carpet was much thicker, a carpet reducer was the perfect fit. It created a gentle slope, preventing any stubbed toes.
T-Molding
T-molding is shaped like the letter ‘T’. The top part covers the seam, and the stem fits into a gap between the two flooring materials. It is best for transitions where both carpet and tile are at roughly the same height.
| Feature | Description |
|---|---|
| Shape | Like the letter ‘T’. |
| Use | Bridges same-height gaps between two hard surfaces, but can work with carpet too. |
| Material | Wood, metal, or vinyl. |
| Installation | The ‘stem’ of the ‘T’ fits into a channel or gap between the two floors. |
I actually used T-molding in another spot where my new, thinner carpet was nearly level with the existing tile. It provided a very neat and low-profile finish.
What Kind of Transition Strip for Carpet to Tile?
I found myself wondering, with so many options, what kind of transition strip is truly the best for a carpet to tile meeting point? It felt like a simple question with a complex answer.
The best kind of transition strip for carpet to tile depends on the height difference between the two flooring materials. Options include Z-bars for minimal height difference, carpet reducers for a more significant height change, and sometimes T-molding if both surfaces are nearly level.
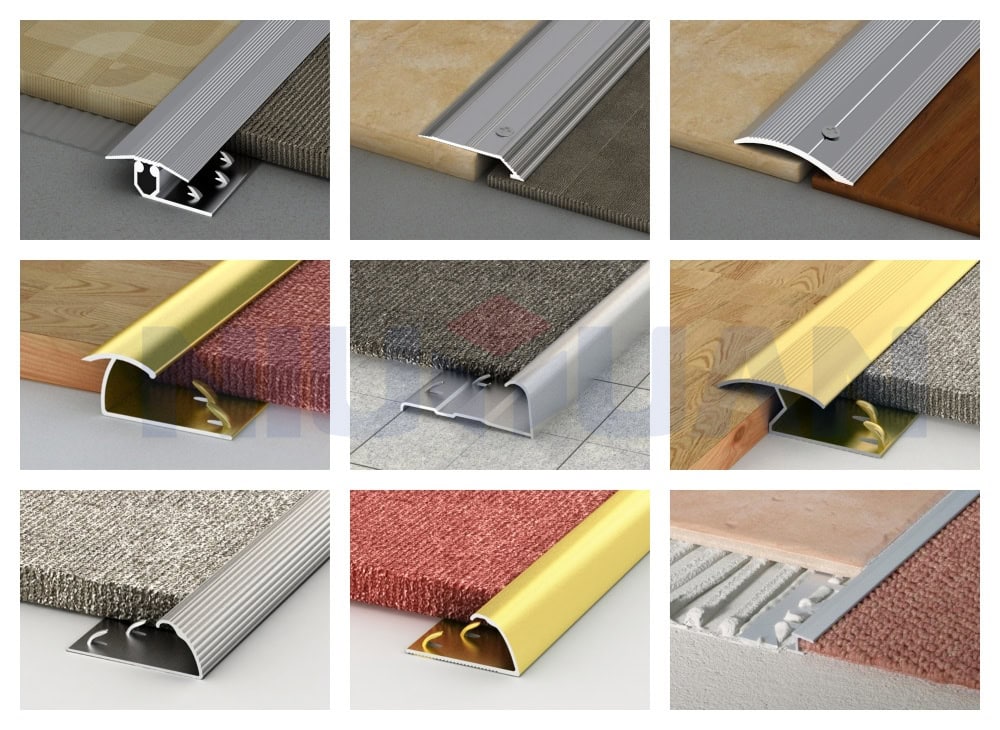
When I tackled my own project, I realized that one size does not fit all. I had to look at my specific situation to pick the right strip. It was not just about what looked good, but what worked best for the height and how much foot traffic the area would get.
Matching the Strip to Your Needs
To pick the right strip, I learned to assess a few key things. Every transition is a little bit different, and the right strip makes all the difference in the final look and function.
Height Difference
The height difference is the main thing to consider. If your carpet and tile are almost the same height, a low-profile strip works best. If one is much higher, you need something that slopes more.
| Height Scenario | Recommended Strip Type |
|---|---|
| Minimal Height Difference | Z-bar (for carpet) or slim T-molding (if using an inlay channel). |
| Carpet Higher Than Tile | Carpet reducer (slopes down from carpet to tile). |
| Tile Higher Than Carpet | Reverse reducer (slopes down from tile to carpet), less common but available. |
| Both Surfaces Level | T-molding (needs a gap for the stem). |
I had one area where the tile was slightly higher, and a reverse reducer was the only thing that made sense for a safe and smooth transition. It was important to check the exact measurements.
Material and Finish
Transition strips come in different materials and finishes. You can find options in metal, wood, or vinyl.
- Metal strips (like aluminum or brass) are durable and come in various colors. They are very common.
- Wood strips can be stained or painted to match existing wood trim or flooring. They offer a warm, natural look.
- Vinyl strips are flexible and good for high-moisture areas or if you need a very low-profile option.
I chose a brushed aluminum strip for one spot because it matched the modern feel of my new tile. For another area, I picked a wood reducer to blend with a nearby hardwood floor.
Traffic Levels
Consider how much traffic the area gets. A high-traffic area needs a more durable strip.
| Traffic Level | Recommended Strip Characteristics |
|---|---|
| High | Durable materials like metal or solid wood; securely fastened. |
| Medium | Most common materials work; good adhesion is key. |
| Low | Less critical, but still prioritize appearance and safety. |
My entryway needed something tough, so I went with a heavy-duty metal Z-bar. It gets a lot of use, and I wanted it to last.
How to Fill a Gap Between Carpet and Tile?
I finished laying the tile, and the carpet was there, but a noticeable gap remained. How do I actually fill that gap between carpet and tile for a perfect finish?
You fill a gap between carpet and tile by installing the correct type of transition strip. The strip is designed to cover the space, bridge any height differences, and secure the edges of both flooring materials. The specific method depends on the chosen strip.

After all the hard work of laying the flooring, dealing with the gap felt like the last hurdle. I learned that filling it wasn’t just about hiding it; it was about protecting my investment and making sure the floor was safe and looked good.
Step-by-Step for Gap Filling
Filling the gap involves choosing the right strip and installing it correctly. I followed a few key steps to make sure I did it right.
Measure and Cut
First, measure the length of the gap carefully. Then, cut the chosen transition strip to size. Always measure twice and cut once.
- Tools: Measuring tape, hacksaw (for metal), miter saw (for wood), or utility knife (for vinyl).
- Precision: A precise cut ensures the strip fits perfectly and looks professional.
I learned the hard way that a slightly too short cut is much worse than a slightly too long one, as you can always trim more.
Prepare the Area
Make sure the subfloor is clean and even where the strip will be installed. Remove any old adhesive or debris. If needed, mark the center line for placement.
- Cleanliness: Dust and debris can stop the strip from sticking or sitting flat.
- Leveling: An uneven subfloor can cause the strip to lift or wobble.
I used a vacuum and a damp cloth to make sure the area was spotless before moving on.
Install the Strip
The installation method depends on the type of strip.
- Nailing/Screwing: Many metal and wood strips are secured directly to the subfloor with nails or screws. Pre-drill holes if needed to stop splitting.
- Adhesive: Some strips, especially vinyl or certain wood types, can be glued down with construction adhesive. Apply a steady bead to the underside.
- Track System: Some T-moldings come with a separate track that you attach to the subfloor first, then snap the molding into.
I decided to screw my metal strip down because it was a high-traffic area and I wanted maximum security. For a less busy spot, I might have used adhesive.
Finish Up
Once the strip is in place, press down firmly to ensure it is secure. For carpet strips, make sure the carpet edge is tucked neatly into the channel.
- Check for security: Wiggle the strip lightly to make sure it is not loose.
- Clean any excess: Wipe away any extra adhesive right away.
I took a moment to admire my work. The gap was gone, and the transition looked seamless and professional.
Conclusion
Almost always, you need a transition strip between carpet and tile. These strips cover gaps, smooth height differences, and protect your flooring. Picking the right one ensures a safe and clean look.
Contact NIUYUAN to explore our premium transition strip options.