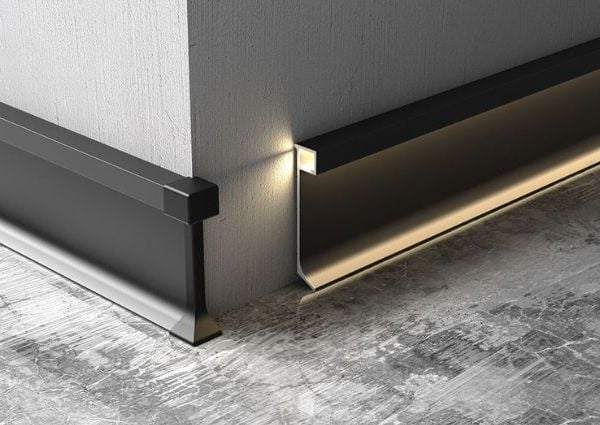
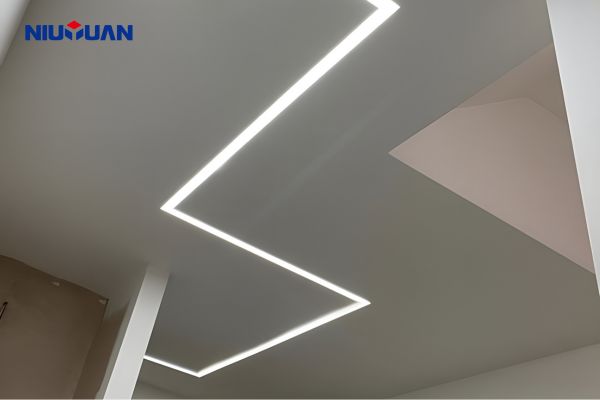
Struggling with bulky, visible light fixtures? Want sleek, integrated lighting? Plaster-in LED Profiles offer a seamless solution for modern designs.
A plaster-in LED strip channel is an aluminum profile designed to be embedded into plaster or drywall. This creates a trimless, clean look where only the light itself is visible, offering a modern and sophisticated lighting solution.
So, you’re curious about how these channels can transform your space. I get it; when I first saw them, I was amazed by the clean lines they create. As someone who’s been in the architectural profiles business with NIUYUAN Trims since 2010, I’ve seen lighting trends come and go, but the appeal of integrated lighting is timeless. Let’s explore what makes them special and how you can use them. Understanding the basics is key before you dive into your next lighting project, and I’m here to guide you through it, sharing some insights from my years of experience.
What is a plaster in LED strip light channel?
Tired of seeing the aluminum edges of your LED profiles? Desire truly invisible light sources? Plaster-in channels are the answer for that ultra-clean look.
It’s a special type of aluminum extrusion, often made from high-quality 6063 alloy like we use at NIUYUAN Trims. You install it flush with your wall or ceiling, then plaster over its perforated flanges. The light source then appears as if built directly into the surface.

This type of channel, sometimes called a trimless LED profile, is a real game-changer for minimalist aesthetics in modern architecture and interior design. At NIUYUAN Trims, we’ve been manufacturing these for years, and the demand from wholesalers, distributors, and design firms globally, especially in North America and Europe, just keeps growing. The core idea is to make the fixture disappear.
The design usually includes several key parts:
- The Main Housing: This is the central part of the channel where the LED strip itself sits securely. Its dimensions are crucial for accommodating different LED strip widths.
- Perforated or Textured Flanges: These wing-like extensions on the sides of the housing are vital. They are designed to be embedded under the plaster or drywall mud. The perforations or texture provide a strong key for the plaster to adhere to, preventing cracks and ensuring a smooth, continuous surface.
- A Diffuser (or Cover): This is typically a snap-on or slide-in cover, often made from PMMA (acrylic) or PC (polycarbonate). Its job is to soften the light, diffuse it evenly to prevent visible hotspots from the individual LED diodes, and protect the LED strip from dust and accidental damage. We offer various diffuser opacities to achieve different lighting effects.
I remember working with an interior design firm on a high-end residential project in Europe. They wanted a ‘glowing line’ effect on a feature wall, almost like light was magically appearing from the wall itself. Standard recessed channels wouldn’t cut it because their trim would still be visible. Plaster-in channels were the only way to achieve that perfectly integrated, trimless look they envisioned. The result was stunning, and it really sold me on how these profiles allow light to become a true architectural element rather than just a fixture. Our capability for mass customization at NIUYUAN Trims also helped them get the exact lengths they needed for that project.
How to install plaster in LED channel?
Want that seamless lighting look but worried about installation? It might seem tricky if you haven’t done it before. But with the right steps and a bit of care, it’s definitely achievable.
Installation typically involves mounting the aluminum channel to the studs or substrate, then applying plaster or drywall compound over its specially designed flanges. After sanding and painting, you install the LED strip and diffuser for a completely trimless finish.

Installing plaster-in LED channels does require a bit more planning and precision compared to surface-mounted or even standard recessed ones, but the incredibly clean and professional result is well worth the extra effort. I’ve seen many contractors, some initially hesitant, successfully tackle this. The key, as with many things in construction, is patience and attention to detail. As a factory, we at NIUYUAN Trims ensure our profiles are designed for straightforward (though careful) installation.
Here’s a general breakdown of the installation process:
Stage 1: Preparation and Mounting
- Detailed Planning and Layout: Before you cut anything, decide exactly where your lines of light will go. Mark your lines precisely on the wall or ceiling. You’ll need to consider where the power supply will be located and how the wiring will run to the channel.
- Creating the Recess: You’ll need to cut a groove or recess into the plasterboard or drywall to accommodate the main body of the channel. The depth and width of this groove must match your chosen profile.
- Mounting the Channel: Secure the aluminum channel within the recess. Most of our NIUYUAN Trims plaster-in profiles can be screwed directly into the studs or substrate through pre-drilled holes or designated areas on the channel. It’s absolutely critical that the channel is perfectly level and that its flanges are flush with what will be the final plaster surface.
Stage 2: Plastering and Finishing
- Applying Plaster/Drywall Compound: This is the most skill-dependent step. Apply your plaster or drywall compound over the channel’s perforated flanges, feathering it out smoothly to blend seamlessly with the surrounding wall or ceiling. This usually takes a couple of coats, with drying and light sanding in between each coat, to achieve a perfectly flat, invisible transition.
- Sanding and Painting: Once the plaster is completely dry and you’ve achieved a smooth, flawless surface, you can prime and paint the area just like any other plastered surface. The channel itself (except the light-emitting part) will now be completely hidden.
Stage 3: Light Installation
- Installing the LED Strip and Diffuser: After painting, it’s time to bring in the light. Adhere your LED tape light into the channel. Most LED strips come with a self-adhesive backing. Then, snap or slide on the diffuser.
It might sound like a detailed process, and it is, but when I first guided a new contractor through it for a hotel lobby project, they were surprised by how logical each step was. The trickiest part, they found, was getting that plaster perfectly smooth around the flanges. But with practice, their team got the hang of it, and the client was thrilled with the ‘invisible’ light sources.
How deep is the plaster in LED profile?
Concerned about the depth needed for plaster-in profiles? Will they fit into your existing wall or ceiling structure? This is a common and very important question, as depth varies.
The depth of plaster-in LED profiles varies significantly depending on the specific model and its intended application. Typically, they can range from around 10mm to 30mm or even more, designed to accommodate standard plasterboard thicknesses and various LED strip sizes.

The depth of a plaster-in LED profile is a critical dimension that you absolutely must consider before you commit to a purchase or start cutting into your surfaces. It’s definitely not a one-size-fits-all scenario. At NIUYUAN Trims, we offer a wide range of profiles with different depths precisely because project requirements can vary so much. We serve global wholesalers and distributors, and they need options for diverse construction standards.
Several factors influence the required or chosen depth of a profile:
| Factor | Impact on Depth Selection | NIUYUAN Trims Consideration |
|---|---|---|
| LED Strip Type | Wider, more powerful LED strips (e.g., with more LEDs per meter or larger diodes) may require deeper channels for better heat dissipation and to prevent hot spots showing through the diffuser. | We design channels to match common LED strip widths and ensure adequate heat sinking from our 6063 aluminum alloy. |
| Plasterboard Thickness | The channel needs to be recessed into the surface. If your plasterboard is standard 12.5mm (half-inch) or 15mm, you’ll need a channel that can be comfortably installed within this. Some deeper channels might require thicker plasterboard or a built-out section. | Our range includes profiles suitable for single and double-layer plasterboard applications. |
| Desired Lighting Effect | Shallower profiles with the LED strip closer to the diffuser might create a more defined, intense line of light. Deeper channels, especially with a more opaque diffuser, can offer broader, more uniform diffusion. | We offer different diffuser types (clear, frosted, opal) to pair with various depths for tailored light output. |
| Structural Elements | For ceilings, you need to ensure there’s enough void space above the plasterboard if the channel protrudes beyond it. For walls, the position of studs can influence your choice and placement. | Our technical data sheets provide precise dimensions to help plan around structural constraints. |
I always advise my clients, from large lighting engineering companies to architectural firms, to meticulously check the specification sheets for the exact dimensions, including depth, width, and flange size. For instance, a common profile we sell for general ambient lighting might be 15mm deep, which is perfect for many single-layer plasterboard applications. But for projects requiring very high-output LEDs or a more substantial architectural feature, we have beefier options that might go up to 25mm or 30mm deep. My personal advice? Always double-check your site conditions and the profile specs before you cut anything! It saves a lot of headaches later.
What are the components of LED strip?
Curious about what makes those flexible LED strips light up so effectively? Understanding the parts helps you choose the right strip for your plaster-in channel and desired effect. It’s actually simpler than you might think!
An LED strip, or LED tape light, fundamentally consists of multiple individual Light Emitting Diodes (LEDs) mounted on a flexible printed circuit board (FPCB). It also includes resistors to regulate current and sometimes integrated circuits (ICs) for more advanced control like color changing.

While the plaster-in aluminum channel, like those we manufacture at NIUYUAN Trims, provides the essential housing, heat dissipation, and that seamless aesthetic, it’s the LED strip itself that actually produces the light. It’s quite fascinating how much lighting technology is packed into these thin, versatile strips. As a manufacturer of architectural profiles designed to protect and enhance these strips, understanding their construction and characteristics is key for us. It helps us design better profiles and advise our B2B clients on the best pairings.
Here’s a closer look at the main components you’ll find in a typical LED strip:
- LEDs (Light Emitting Diodes): These are the tiny semiconductor devices that emit light when an electric current passes through them. They are the heart of the strip.
- Types: Common types are identified by their size in millimeters, like SMD 2835 (2.8mm x 3.5mm) or SMD 5050 (5.0mm x 5.0mm). Larger SMDs often mean brighter output.
- Color: They come in various shades of white (warm white, neutral white, cool white), single colors (red, green, blue, etc.), and multi-color options like RGB or RGBW (RGB + White).
- Density: This refers to the number of LEDs per meter (or foot). Higher density generally means more uniform light and greater brightness, which is important for plaster-in channels to avoid spotting.
- FPCB (Flexible Printed Circuit Board): This is the long, narrow, flexible base material onto which all the other components are soldered.
- Flexibility: Its ability to bend (within limits) allows LED strips to be installed on curved surfaces and cut to specific lengths.
- Conductive Tracks: It contains copper tracks that carry power to the LEDs.
- Resistors: You’ll see small resistors mounted periodically along the strip. These are crucial for limiting the electrical current flowing through the LEDs. Without them, the LEDs would draw too much current and burn out quickly.
- Cutting Marks: Most LED strips have designated cut lines, often indicated by a scissor icon. These typically appear every 3 or 6 LEDs (depending on the strip’s voltage). Cutting at these points allows you to customize the length of the strip without damaging it.
- Adhesive Backing: The vast majority of LED strips come with a self-adhesive tape on the back (commonly 3M brand) for easy peel-and-stick mounting inside the aluminum channel.
- Connectors/Wiring (at the ends): Strips usually have pre-soldered wires at one or both ends for connecting to a power supply or to other strips.
When I’m discussing projects with lighting designers or contractors, we often talk about the LED strip specifications in detail. For a high-quality plaster-in installation where the light is a distinct architectural feature, using a strip with high LED density and good color rendering (CRI) is essential to get that smooth, attractive line of light without visible dots, especially through the diffuser. Our NIUYUAN Trims channels are designed to work with a wide variety of these strips, offering excellent heat dissipation to ensure the LEDs have a long and efficient life.
Conclusion
Plaster-in LED channels offer a truly stunning way to achieve seamless, integrated lighting. With careful planning, the right high-quality profiles, and suitable LED strips, you can create beautifully modern light in any space.
As an LED aluminum profile manufacturer, we produce various types of LED profiles and provide OEM & ODM services. If you need to purchase LED aluminum profiles in large quantities in the near future, please feel free to contact us at any time.